Wednesday, August 30, 2017

Some solutions are purely simple

I've had a bad start to my day today! My Nexus 5X just died randomly. I was browsing on it when suddenly the screen turned blank! This has never happened before with this phone. I had been having a bit of trouble with the Sim card detection but this was something completely new! It did boot into the bootloader a few times, but now it's not even doing that! Looks like it's the end of the road for this guy :(.

I use an iMac in my office and with it Apple's Bluetooth wireless keyboard and magic mouse. While working my mouse kept disconnecting with the MAC. Already frustrated with my phone's death, I thought this is one of those days where nothing is going to work! Initially i thought that the mouse might be paired with some other PC somewhere on the floor and it might be connecting to it. The mouse has been used before by someone else. I tried renaming it but the problem persisted. However a simple google search led me to a helpful answer and turns out that the simplest of solutions worked and it wasn't a big problem.

https://discussions.apple.com/thread/4261715?start=0

The problem is that the magic mouse uses AA batteries. Not all of them are exactly the same size. Therefore when the mouse moves a little bit, the batteries loose their connection. Fixing a small piece of paper between the batteries did the trick! A simple solution and now I have no disconnection issues! I hope my Nexus 5x's problem can have a simple solution as well. I usually add pictures for proof of what I'm talking about, unfortunately with my cell phone dead can't do that with this post! Oh wait, maybe I can use my MAC's front camera to take a few snaps of the mouse and the dead Nexus!
Aug 30, 2017 12:05:07 PM.jpg
Aug 30, 2017 12:06:08 PM.jpg
Aug 30, 2017 12:06:42 PM.jpg

Thursday, August 24, 2017

Node-Red on the Raspberry PI

In my last post I talked about playing with Node-Red on my MacBook. My actual goal was to get started with Node-Red on my Raspberry PI to make some cool application. Turns out, Raspbian the OS for the Raspberry PI already comes pre-installed with Node-Red. So much for my observation skills.


I've been usually using a 10" HDMI touch screen for the Raspberry PI which I won in an idea competition. I haven't used a VGA monitor with the PI in a long time so the first problem I faced was using the HDMI - RGB converter with the PI. With the default settings the Raspberry PI won't show any display. A little search led me to the forums which led me to the solution. Here are the steps that I used to use an HDMI - RGB converter with the PI. 


Step 1: Open Terminal
Step 2: Navigate to /boot/
Step 3: Use sudo nano /boot/config.txt
Step 4: Navigate to the line that says #hdmi_safe=1 and uncomment it by removing the # sign.
Step 5: Also find the line #hdmi_force_hotplug=1 and uncomment it by removing the # sign. 
Step 6: Sudo reboot to restart your PI for the changes to take effect.

What is happening is that since the HDMI to RGB connector does not recognize any activity on the HDMI port it forces the display to the Video out port. Both these lines force the video output to HDMI. 

For newbies Sudo is the command that is used to gain administrator access. Without it you won't have the previliges to modify and save config.txt. nano is a text editor in which we open the file config.txt which is read by the PI at bootup time to setup it's configuration. 

References:

Wednesday, August 23, 2017

Playing with Node Red on my MAC

For this semester I'll be teaching two courses at NUST. One is an undergraduate course whereas the other is a graduate course. This is my first time with both of these courses, so there is a bit of excitement and apprehension if I'll be able to deliver my lectures in a great way. There are only a couple of weeks left in the classes so I've started playing around with technologies that I might be utilizing in delivering my lectures. Today I'm playing with Node-Red to build basic web applications. The idea is to play with it on my laptop then shift to an embedded computer like the Raspberry PI to build a practical daily use application.

The first step I did was to navigate to the node-red website and install the node and npm package using the pkg file on the website. Since I'm using MAC I needed this one.

https://nodejs.org/en/download/


Since I have npm installed on my MAC the other method of installing node-red was to use the following command in terminal


sudo npm install -g --unsafe-perm node-red

Once node-red is installed, run the node-red command to see the following output

$ node-red

Welcome to Node-RED
===================

25 Jun 22:51:09 - [info] Node-RED version: v0.17.4
25 Jun 22:51:09 - [info] Node.js  version: v6.11.1
25 Jun 22:51:09 - [info] Loading palette nodes
25 Jun 22:51:10 - [warn] ------------------------------------------
25 Jun 22:51:10 - [warn] [rpi-gpio] Info : Ignoring Raspberry Pi specific node
25 Jun 22:51:10 - [warn] ------------------------------------------
25 Jun 22:51:10 - [info] Settings file  : /home/nol/.node-red/settings.js
25 Jun 22:51:10 - [info] User Directory : /home/nol/.node-red
25 Jun 22:51:10 - [info] Server now running at http://127.0.0.1:1880/
25 Jun 22:51:10 - [info] Creating new flows file : flows_noltop.json
25 Jun 22:51:10 - [info] Starting flows
25 Jun 22:51:10 - [info] Started flows

If you see this output that means node-red was successfully installed and now you can  run it in your browser by typing the following in your browser bar

http://localhost:1880

If you know the ip address of your laptop then you can remotely run Node-red over the network. 


In order to make your first flow using node-red use the following tutorial. In fact I've followed it to explore node-red for the first time on my own and run my first two examples. 


Total credits for this blog post are to be given to : https://nodered.org/docs/getting-started/first-flow 
My next step to follow the same tutorial to deploy Node-Red on a Raspberry PI and make some physically interactive application. Till then Allah Nigehbaan!


Monday, August 7, 2017

DOS Games for the boring Meetings

In my last post I wrote about how I re-utilized an almost dead slow windows XP Acer netbook by installing Linux Mint on it. My next task was to make it ready for the boring departmental meetings that I'm faced with every day as a university teacher. So the first step was to install Dos Box and download a few dos games that I played while growing up.  Here are the steps that I followed:

Step 1: Install DosBox
https://community.linuxmint.com/software/view/dosbox
Just clicking on the install button will install DosBox and create a shortcut menu in the Games tab

Step 2: Download a few Dos Games
https://www.emuparadise.me/Abandonware_Games/51 
[Disclaimer: I do not support piracy. Download at your own risk]

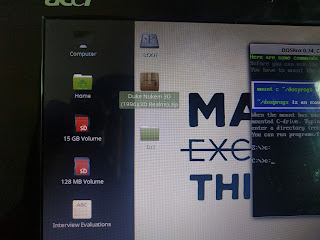
Step 3: Unzip and mount the game on DosBox
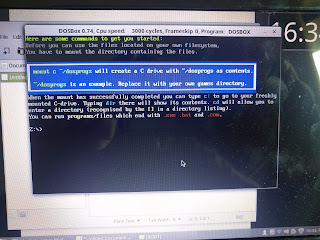
Once you have downloaded the zip file, unzip it and mount it after launching DosBox. Once you can see the Dos prompt you can use the command intro mount to see how to mount a game director to DosBox. The first game I downloaded and installed was Duke Nukem 3d.


  • Unzip Duke Nukem 3d to let's say Desktop
  • Use the mount command on DosBox " mount c ~/Desktop/DN " , here DN was the folder to which I unzipped my Duke Nukem zip file. "c" is the name of the virtual drive to which the folder DN will be mounted to. 
  • Once the folder is mounted you can navigate to that director just like in DOS by typing c:
  • Now using dir lists all the executable files. You need to run setmain or setup first to setup Duke Nukem run settings like sound and keyboard
  • Once that is done, simply type duke3d to play the game
  • Make sure you don't play this game in a meeting


Here is a video preview. My music is playing but something is wrong with the sound effects. Need to figure that out. Enjoy!


Linux MINT on an Acer Netbook

I had an old Acer Aspire One with an Intel Atom processor. Since the notebook is an old model with an SD card as a hard drive, it was pretty slow and became obsolete. The last user was my Dadi (paternal grandmother) who used Skype on it to talk to my aunts abroad. Since my Dadi hadn't used a computer before, therefore she wasn't as frustrated with the slow speed of this netbook as any other user would be. Then she bought an iPad and the netbook became obsolete.

I really wanted to do something with it and tried installing Arduino but on windows it was almost impossible to use with its slow interface. I looked online for something to do with it and found that Linux Mint is a good distribution to use with the Acer netbook. I followed a few tutorials and installed Linux mint on it. It became quite a useful notebook which I could use for simple browsing and checking emails. Here are some pictures of the Acer Aspire One Netbook which is doing very well as an email checking device for boring meetings. With a battery backup of around 1.5 hours, its a perfect companion to play games during boring meetings.


It has the following specifications.
Acer Aspire One usual specifications:
  • 1.6GHz N270 Intel Atom Processor.
  • 1GB DDR2 533MHz.
  • Windows XP Home SP3.
  • 8.9″ 1024 x 600 WSVGA glossy LED backlit display.
  • 120GB 2.5″ 5400RPM Hitachi Hard Drive (with SDHC storage expansion slot)  Mine has 16GB SD storage (which made it really slow with Windows XP)
  • 802.11b/g Atheros Wireless.
  • 3-Cell 23Wh battery.
  • Size: 9.75″ x 6.625″ x 1.28″

Here is a demo video in action. Next step installing and running Doom for those boring departmental meetings.